DB Security
Unified Auditing
prayank waluskar
Introduction to Unified Auditing and steps to configure it
Introduction
Unified Auditing is Oracle’s modern auditing framework introduced in Oracle Database 12c. It consolidates multiple audit mechanisms into a single, centralized audit trail.
Before Unified Auditing, Oracle used separate audit systems such as:
- Standard Auditing
- Fine-Grained Auditing (FGA)
- RMAN Auditing
- Database Vault Auditing
- Label Security Auditing
Unified Auditing combines all these into one architecture.
Key Features
- Centralized Audit Trail -> All audit records are stored in: UNIFIED_AUDIT_TRAIL view
- Better Performance -> It Uses SGA queue buffering which helps in reducing disk I/O. And, Supports queued or immediate write modes.
- Policy-Based Auditing -> Auditing is configured using reusable policies. Example, Audit CREATE TABLE, Audit failed logins, Audit actions by specific users, etc.
- Multitenant Support -> It supports CDB/PDB, Common/local policies.
Unified Auditing Architecture
| Component | Description |
| CREATE AUDIT POLICY | Defines audit rules |
| AUDIT POLICY | Enables policy |
| UNIFIED_AUDIT_TRAIL | View audit records |
| DBMS_AUDIT_MGMT | Audit management package |
| AUDSYS.AUD$UNIFIED | Internal audit table |
Types of Auditing Supported
| Type | Example |
| Privilege auditing | CREATE USER |
| Statement auditing | CREATE TABLE |
| Object auditing | SELECT on HR.EMP |
| Role auditing | DBA role usage |
| Fine-Grained Auditing | Sensitive row access |
| Conditional auditing | Audit only APP_USER |
Step-by-Step Configuration of Unified Auditing
Step 1: Enable the Unified Auditing and Disable the traditional auditing
At first, we will check the current status of unified auditing and traditional auditing. If the traditional auditing is enabled, we will disable it. Then, we will bring down the database.
SELECT VALUE FROM V$OPTION WHERE PARAMETER = 'Unified Auditing';
show parameter AUDIT_TRAIL
alter system set audit_trail='NONE' scope=spfile;
shutdown immediate;
Code language: PHP (php)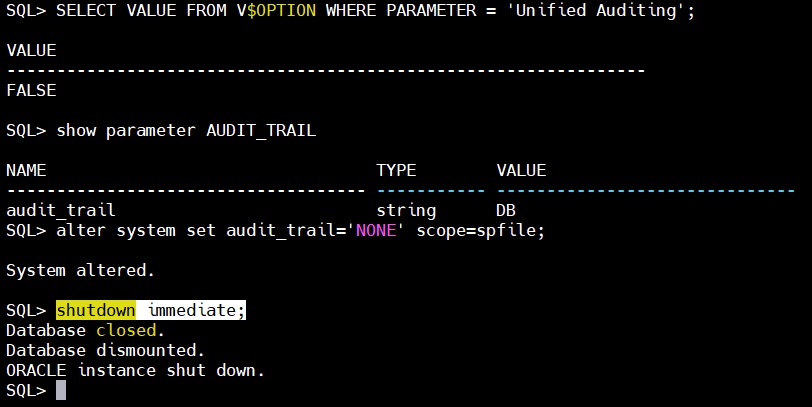
Now, we will relink the Oracle kernel executable (oracle) with Unified Auditing enabled.
cd $ORACLE_HOME/rdbms/lib
make -f ins_rdbms.mk uniaud_on ioracleCode language: PHP (php)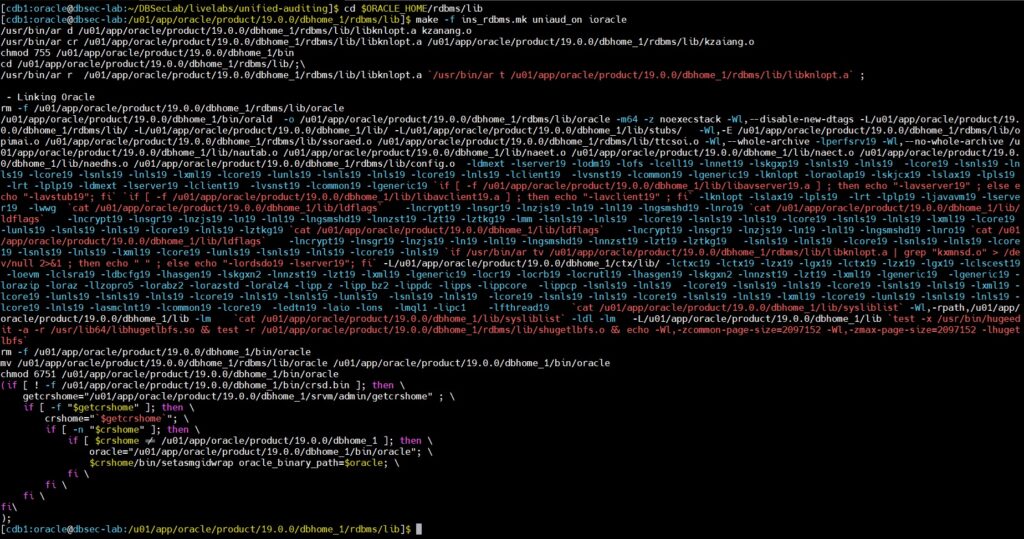
Bring up the DB and check the status of unified Auditing.
startup;
SELECT VALUE FROM V$OPTION WHERE PARAMETER = 'Unified Auditing';Code language: PHP (php)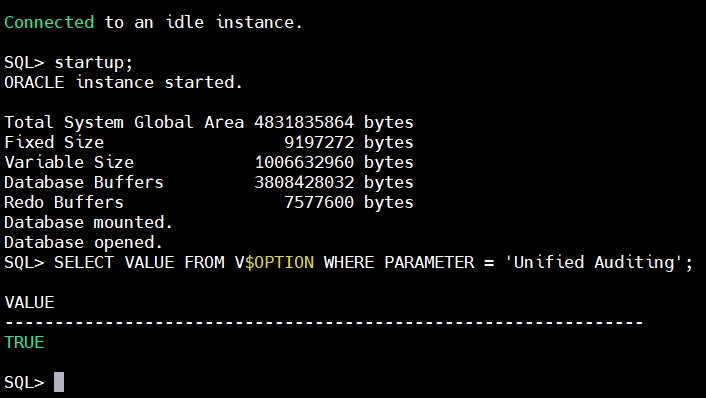
Step 2: Changing the default tablespace for the Unified Auditing
Create the tablespace for storing audit trail. And, assign it to unified auditing
CREATE TABLESPACE AUDIT_DATA DATAFILE '/u01/oradata/cdb1/pdb1/audit_data01.dbf' SIZE 500M AUTOEXTEND ON NEXT 100M MAXSIZE 5G;

BEGIN
DBMS_AUDIT_MGMT.SET_AUDIT_TRAIL_LOCATION(
 audit_trail_type => dbms_audit_mgmt.audit_trail_unified,
 audit_trail_location_value => 'AUDIT_DATA');
END;
/

col owner for a10
col table_name for a15
col tablespace_name for a12
col interval for a20
set lines 200
select owner,table_name,interval,partitioning_type,partition_count,def_tablespace_name from dba_part_Tables where owner='AUDSYS';Code language: PHP (php)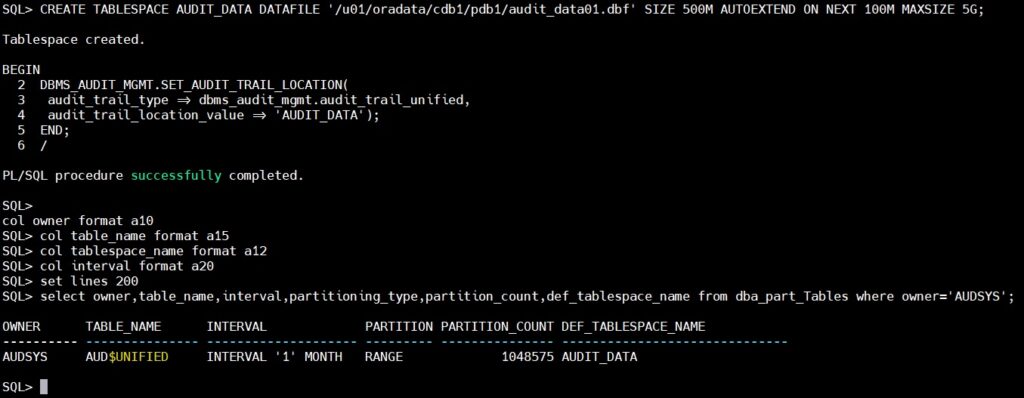
Step 3: Changing the default Partition Interval to 1 Day for the Unified Auditing
col owner for a10
col table_name for a15
col tablespace_name for a12
col interval for a20
set lines 200
select owner,table_name,interval,partitioning_type,partition_count,def_tablespace_name from dba_part_Tables where owner='AUDSYS';

BEGIN
  DBMS_AUDIT_MGMT.ALTER_PARTITION_INTERVAL(
    interval_number    => 1,
    interval_frequency => 'DAY'
  );
END;
/

select owner,table_name,interval,partitioning_type,partition_count,def_tablespace_name from dba_part_Tables where owner='AUDSYS';Code language: PHP (php)
Step 4: Create an Unified Audit Policy – audit ALL actions for the user app_user.
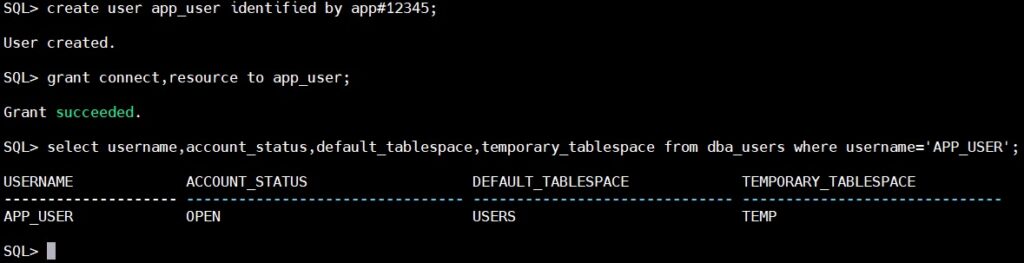
Create a test user “APP_USER”
Now, let’s create a policy and apply it
CREATE AUDIT POLICY policy_for_app_user
ACTIONS ALL
WHEN 'SYS_CONTEXT(''USERENV'', ''SESSION_USER'') = ''APP_USER'''
EVALUATE PER SESSION
CONTAINER = CURRENT;

AUDIT POLICY policy_for_app_user;Code language: JavaScript (javascript)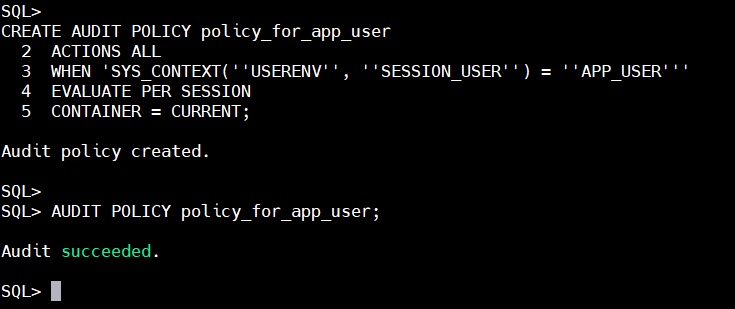
Now, we will run some commands with “APP_USER” to generate some audit logs.
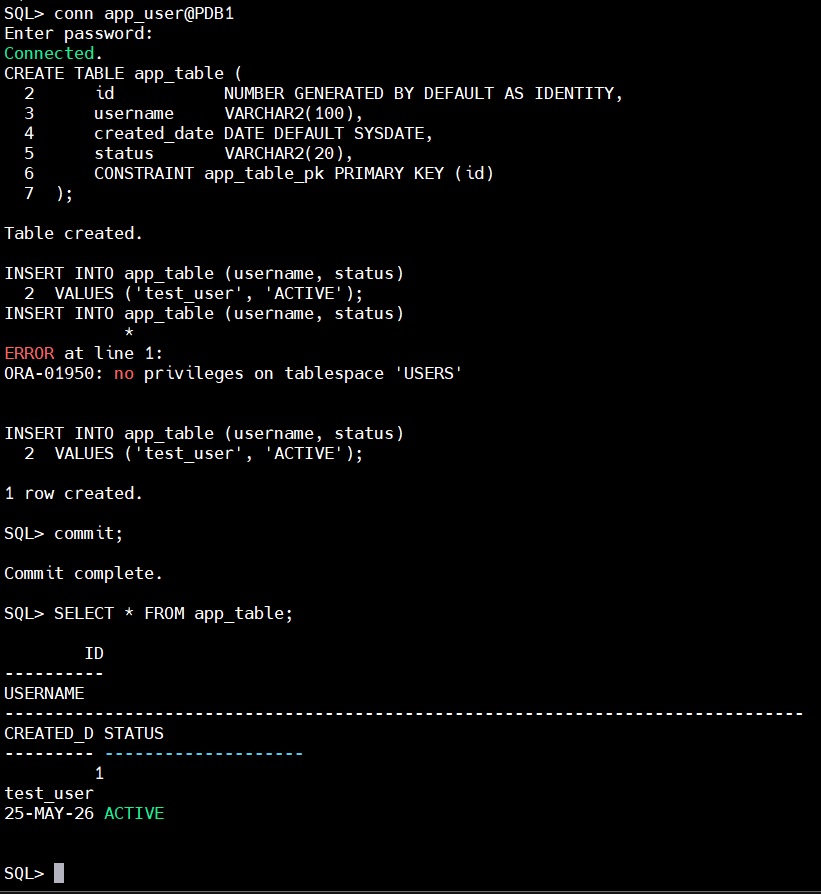
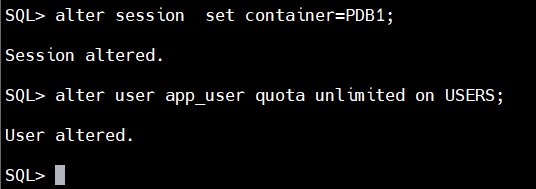
Here we did face an error, that the user was not having privilege to write on tablespace USERS. To solve this issue run below command as sysdba
Now, we will view the audit trails to check the records
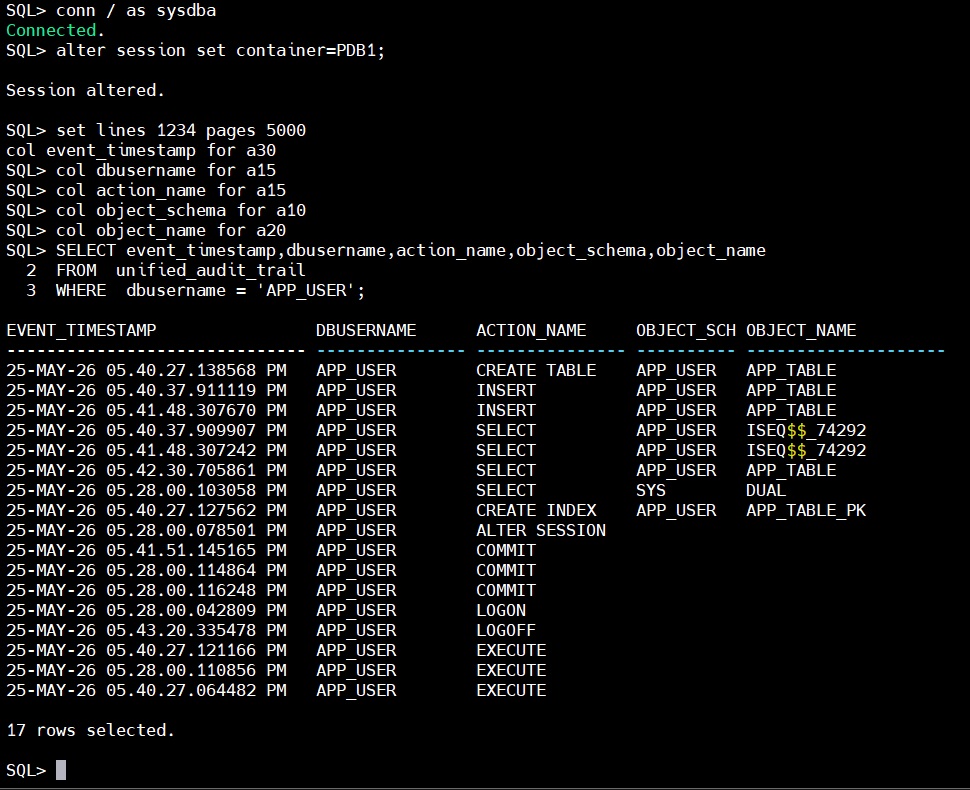
Here, we can see that the actions performed by user “APP_USER” are getting recorded in audit trails.
Purging the Audit Trails
Manual Purging
The Manual purging can be performed by running below set of commands.
select count(*) from audsys.unified_audit_trail;

BEGIN
  DBMS_AUDIT_MGMT.SET_LAST_ARCHIVE_TIMESTAMP(
   AUDIT_TRAIL_TYPE     =>  DBMS_AUDIT_MGMT.AUDIT_TRAIL_UNIFIED,
   LAST_ARCHIVE_TIME    =>  '25-MAY-2026 05:50:49PM',
   RAC_INSTANCE_NUMBER  =>  1,
   CONTAINER            => DBMS_AUDIT_MGMT.CONTAINER_CURRENT);
END;
/

BEGIN
  DBMS_AUDIT_MGMT.CLEAN_AUDIT_TRAIL(
   AUDIT_TRAIL_TYPE           =>  DBMS_AUDIT_MGMT.AUDIT_TRAIL_UNIFIED,
   USE_LAST_ARCH_TIMESTAMP    =>  TRUE,
   CONTAINER                  =>  DBMS_AUDIT_MGMT.CONTAINER_CURRENT );
END;
/

select count(*) from audsys.unified_audit_trail;Code language: PHP (php)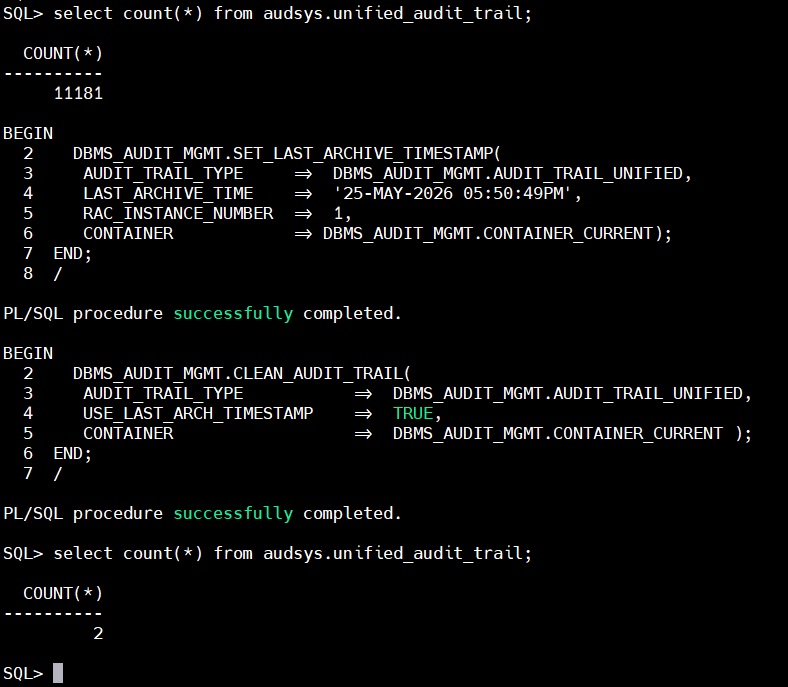
Purging audit trails using a scheduled job
BEGIN
  DBMS_AUDIT_MGMT.CREATE_PURGE_JOB (
   AUDIT_TRAIL_TYPE            => DBMS_AUDIT_MGMT.AUDIT_TRAIL_UNIFIED,
   AUDIT_TRAIL_PURGE_INTERVAL  => 24,
   AUDIT_TRAIL_PURGE_NAME      => 'Unified_Audit_Trail_Purge_Job',
   USE_LAST_ARCH_TIMESTAMP     => TRUE,
   CONTAINER                   => DBMS_AUDIT_MGMT.CONTAINER_CURRENT);
END;
/Code language: PHP (php)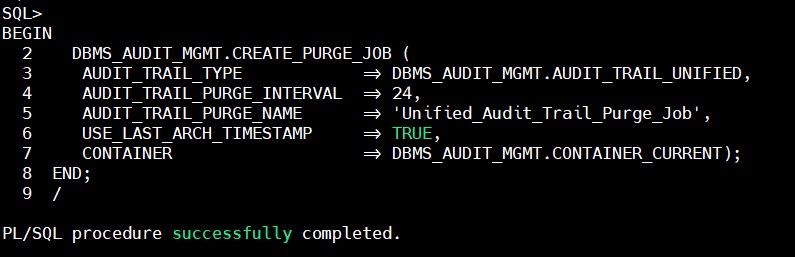
To view the details of the job we can use below select statement
SELECT JOB_NAME,
       JOB_STATUS,
       AUDIT_TRAIL,
	   JOB_FREQUENCY,
       JOB_CONTAINER
FROM dba_audit_mgmt_cleanup_jobs
WHERE JOB_NAME = 'UNIFIED_AUDIT_TRAIL_PURGE_JOB';Code language: JavaScript (javascript)
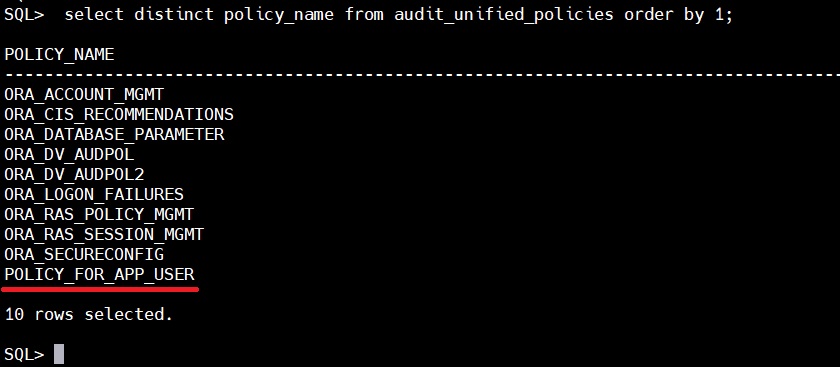
How to view the list of active audit policies
In the below snap we can see that there are few preconfigured audit policies and at bottom we can see our configured audit policy (underlined for reference).